The most frustrating thing about coding on Windows is cmd! WSL is truly our savior.
Previously, I was using Ubuntu WSL from the store and didn't feel anything wrong, but after trying Arch WSL, I can really feel the turtle speed of Ubuntu WSL...
Arch WSL really opens in seconds!
Here’s the link:
Download and Install Arch WSL#
Here is the author's installation tutorial: https://github.com/yuk7/ArchWSL/wiki
I chose the traditional installation method (not using AppX):
- Download the latest
Arch.zipfrom Release - Extract it to the root directory of the C drive (it must be on the C drive, but other locations are also fine), but you need read and write permissions for that directory, so it cannot be placed in directories like
Program Files. - Double-click the extracted
Arch.exeto install; the name of the .exe is the name of the WSL instance to be created. By changing the name, you can create multiple Arch WSL instances.
After installation, proceed with configuration.
Configure Software Repository#
Arch Linux Software Repository Domestic Mirrors#
Edit /etc/pacman.d/mirrorlist, where there are commented China mirrors. Just uncomment one you like.
Then update the package cache by executing: pacman -Syyu
For more information related to mirrors, you can check here:
https://wiki.archlinux.org/index.php/Mirrors_(%E7%AE%80%E4%BD%93%E4%B8%AD%E6%96%87)
Add ArchlinuxCN Source#
The Arch Linux Chinese Community Repository is an unofficial user repository driven by the Arch Linux Chinese community. It includes commonly used software, tools, fonts/beautification packages, etc.
Official repository address: http://repo.archlinuxcn.org
Here I use Tencent's mirror: http://mirrors.cloud.tencent.com/archlinuxcn/
Usage:
Add the following two lines to the end of the /etc/pacman.conf file:
[archlinuxcn]
Server = https://mirrors.cloud.tencent.com/archlinuxcn/$arch
Then install the archlinuxcn-keyring package to import the GPG key:
pacman-key --init
pacman-key --populate
pacman -Syy && pacman -S archlinuxcn-keyring
Install AUR Helper yay#
The Arch User Repository (commonly referred to as AUR) is a community-driven software repository for Arch users. The equivalent for Debian/Ubuntu users is PPA.
AUR contains software that is not directly endorsed by Arch Linux. If someone wants to publish software or packages on Arch, it can be provided through this community repository. This allows end users to access more software than what is available in the default repositories.
So how do you use AUR? Simply put, you need additional tools to install software from AUR. Arch's package manager pacman does not directly support AUR. Those "special tools" that support AUR are called AUR helpers.
When we want to install something from the AUR repository, we need an AUR helper, and here I recommend yay.
pacman -S yay
After installing yay, git will also be installed.
Check for updates to local packages:
yay
Switch to domestic AUR source:
# yay --save --aururl [url]
yay --save --aururl https://aur.tuna.tsinghua.edu.cn
The configuration file path for yay: ~/.config/yay/config.json
View yay configuration:
yay -P -g
View yay help:
man yay
Create a Regular User in Arch#
The freshly installed Arch is a root user. To avoid excessive permissions that could harm the system, you can create a regular user first.
Add a user:
useradd -m artin
# The -m option helps create /home/artin
Set the user password:
passwd artin
Before the next step, you can set the system's default editor to vim, which I personally find much more useful than vi and nano...
export EDITOR=vim;
You can also set it to your preferred editor.
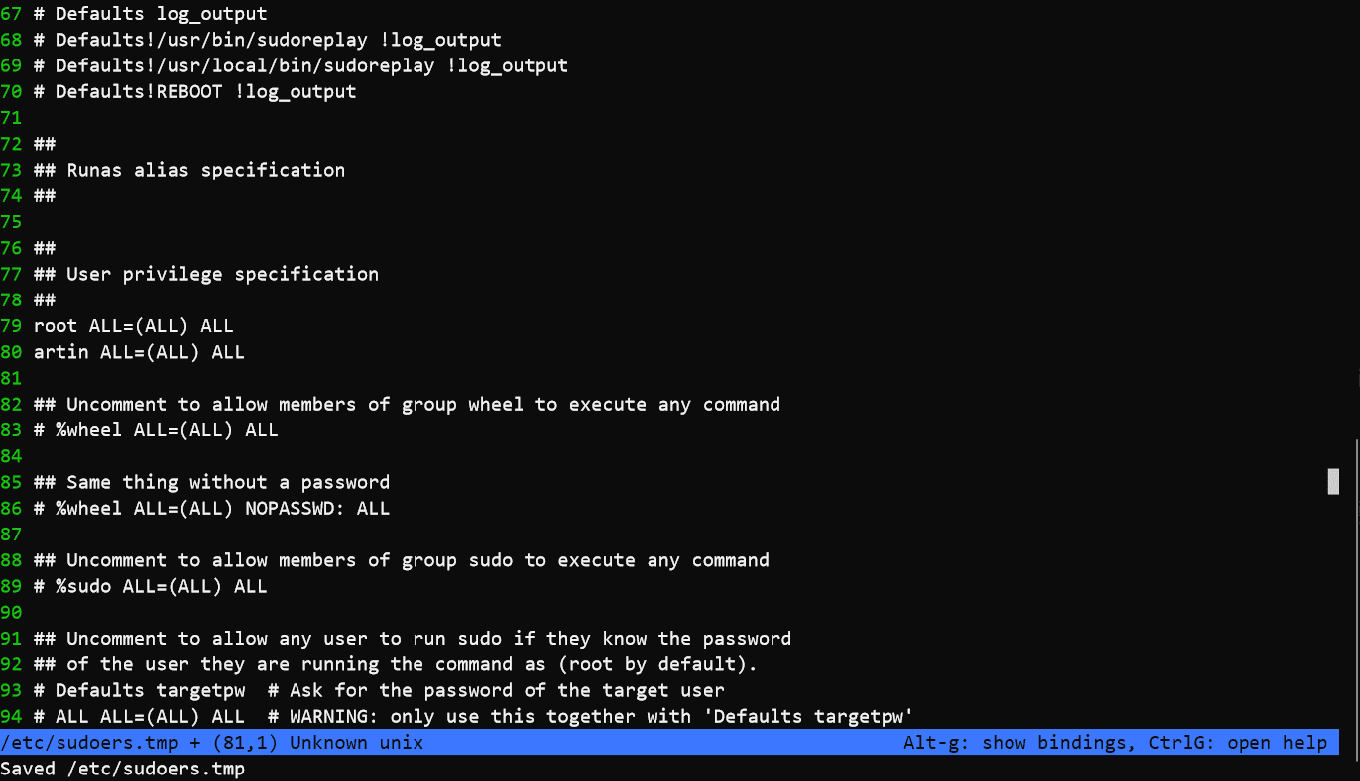
Allow the user to execute sudo commands; this step cannot be omitted.
Use the following system command to modify the sudoers file.
visudo
Just add this line inside:
artin ALL=(ALL) ALL

Here I only wrote my username; you can also set permissions for a user group and then add your user to that group.
Switch WSL Default User#
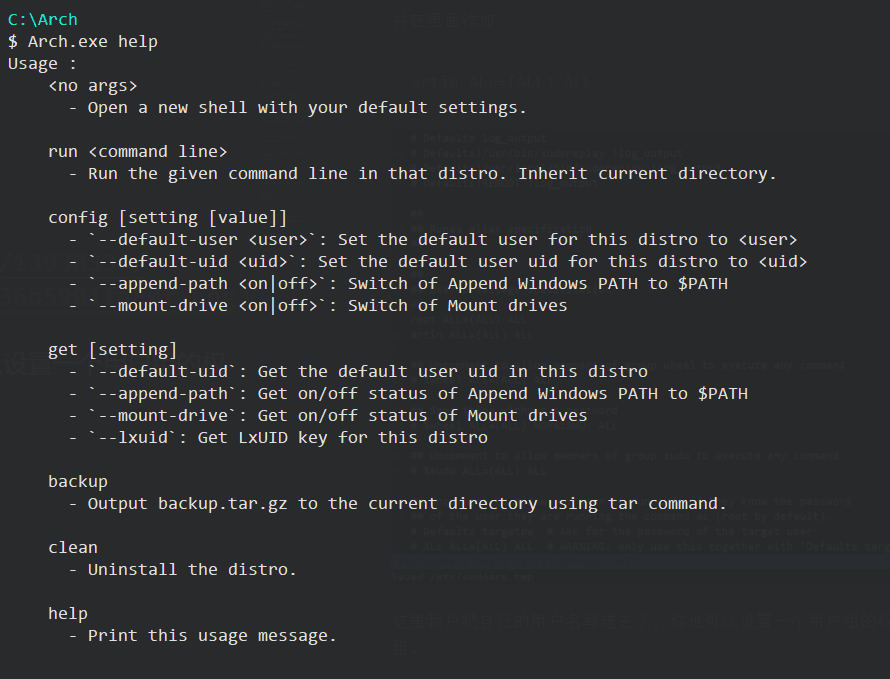
Open your installation directory in cmd:

Execute:
Arch.exe config --default-user artin
Mastering Arch WSL#
Then there are some configurations that I personally like.
pacman Usage#
Essential command records for ArchLinux (manjaro) - Blog by weixin_42408100 - CSDN Blog
https://blog.csdn.net/weixin_42408100/article/details/82526087
| Common Commands | Explanation |
|---|---|
| pacman -Sy abc | Install the package named abc after syncing with the repository |
| pacman -S abc | Get information about abc from the local database and install the abc package |
| pacman -Sf abc | Force install package abc |
| pacman -Ss abc | Search for packages related to abc |
| pacman -Si abc | Search for information about package abc in the database |
| pacman -Syu | Sync the repository and update the system |
| pacman -Sy | Only sync the repository |
| pacman -R abc | Remove package abc |
| pacman -Rc abc | Remove package abc and packages that depend on abc |
| pacman -Rsn abc | Remove all unnecessary dependencies of the package and delete its configuration files |
| pacman -Sc | Clean old packages in the /var/cache/pacman/pkg directory |
| pacman -Scc | Clear all downloaded packages and database |
| pacman -Sd abc | Ignore dependency issues and install package abc |
| pacman -Su --ignore foo | Do not upgrade package foo during upgrade |
| pacman -Sg abc | Query the software packages included in the abc package group |
| pacman -Q | List all packages in the system |
| pacman -Q package | Search (query) for the specified package in the local package database |
| pacman -Qi package | Search (query) for the specified package in the local package database and list related information |
| pacman -Q ` | ` wc -l |
| pacman -Qdt | Find orphaned packages |
| pacman -Rs $(pacman -Qtdq) | Remove orphaned packages (recursively, use with caution) |
| pacman -U abc.pkg.tar.gz | Install the downloaded abs package or newly compiled local abc package |
| pacman-optimize && sync | Improve database access speed |
Install Network-Related Tools#
Reference http://www.linuxdiyf.com/view_218403.html
After installing archlinux, commands like ifconfig, route, nslookup, etc., are not available.
- ifconfig, route are in net-tools
- nslookup, dig are in dnsutils
- ftp, telnet, etc., are in inetutils
- The ip command is in iproute2
pacman -S net-tools dnsutils inetutils iproute2
Configure Basic Environment#
Install fakeroot, binutils, and other basic packaging tools
pacman -S base-devel
Here it will prompt that fakeroot is ignored because it is written in /etc/pacman.conf~
If you do not enter a number, it will default to installing all packages in base-devel.
Install and Configure zsh#
Install zsh and oh-my-zsh#
zsh is beautiful, useful, and powerful~
First, set the proxy to my local proxy link because the oh-my-zsh script will download things from github, which is slow from within the country~
export ALL_PROXY="http://127.0.0.1:7890"
export all_proxy="http://127.0.0.1:7890"
First install zsh, then install oh-my-zsh.
Execute in the terminal:
sudo pacman -S zsh
sh -c "$(curl -fsSL https://raw.github.com/robbyrussell/oh-my-zsh/master/tools/install.sh)"
Configure Alias#
After that, I often need to modify zsh, so I’ll configure a few convenient and quick aliases.
Edit ~/.zshrc, the configuration file for zsh.
vim ~/.zshrc
Add the following lines at the end of the file:
alias vizsh="micro ~/.zshrc"
alias ohmyzsh="micro ~/.oh-my-zsh"
alias rezsh="source ~/.zshrc"
Here, micro is the editor I am using:
You can change it to whatever you like.
After saving, activate the zsh configuration file in the terminal:
source ~/.zshrc
And that’s it~
Configure PATH Variable#
The environment variables in WSL come from the Windows system, so if you have npm or python installed on both sides, it may cause various errors...

So manually streamline some environment variables; just take a little from the above image.
Edit ~/.zshrc:
vizsh
Add:
export PATH="$HOME/bin:/usr/local/bin:/usr/local/sbin:/usr/local/bin:/usr/sbin:/usr/bin:/sbin:/bin:/usr/games:/usr/local/games"
export PATH="/usr/bin/site_perl:/usr/bin/vendor_perl:/usr/bin/core_perl:$PATH"
# Adding directories like `c/WINDOWS/system32` is to support `remote-wsl` in `vscode`.
export PATH="/mnt/c/WINDOWS/system32:/mnt/c/WINDOWS:/mnt/c/WINDOWS/System32/Wbem:/mnt/c/WINDOWS/System32/WindowsPowerShell/v1.0/:/mnt/c/WINDOWS/System32/OpenSSH/:$PATH"
# To use `code .` in vscode
export PATH="/mnt/c/Users/withw/AppData/Local/Programs/Microsoft VS Code/bin:$PATH"
These are what I need; you can determine what to use based on your needs.

Other zsh Configurations#
Configure several built-in plugins of oh-my-zsh:
- Built-in plugin list: https://github.com/robbyrussell/oh-my-zsh/tree/master/plugins
- Plugin Wiki: https://github.com/robbyrussell/oh-my-zsh/wiki/Plugins
Find the following line and fill it in:
plugins=(git npm node history)
Configure zsh to "not match wildcards":
This is quite useful; for example, when you want to use find *.txt.
setopt no_nomatch
Set a few handy functions:
proxy () {
    export ALL_PROXY="http://127.0.0.1:7890"
    export all_proxy="http://127.0.0.1:7890"
    http --follow -b https://api.ip.sb/geoip
}

unpro () {
    unset ALL_PROXY
    unset all_proxy
    http --follow -b https://api.ip.sb/geoip
}

# Reference from:
# Source: Ubuntu "one-click" set proxy | Sukka's Blog
# Link: https://blog.skk.moe/post/enable-proxy-on-ubuntu/

ip_ () {
    http --follow -b https://api.ip.sb/geoip
}

git-config() {
    echo -n "Please input Git Username: "
    read username
    echo -n "Please input Git Email: "
    read email
    echo -n "Done!"
    git config --global user.name "${username}"
    git config --global user.email "${email}"
}
# Reference from:
# Link: https://github.com/SukkaW/dotfiles
The http command in the above script comes from httpie.
Install it:
pacman -S httpie
Using WSL in VSCode#
To be continued
More Optimization Configurations#
You can refer to this article on Zhihu: Using WSL to Build an Arch Development Environment
That's about all I want to write for now~