我之前都是使用自己的郵箱訂閱 Newsletter,但是每天好多郵件發送給你,混雜在一些提醒和交流郵件中,怪麻煩的。
也嘗試過好幾個訂閱 newsletter 的應用,也了解了 mail2rss 這方面的網站和開源項目,一直沒有啥好的解決方案。
有一天偶然看到 testmail.app 這個可以讓開發者測試郵件服務的網站,每個用戶可以有一個 namespace,然後可以構造出無限個郵件地址,也有相應的 API 用來過濾郵件等等。
testmail 免費版每個月可以接收 100 封郵件,郵件能保存一天。但是只需要設置 RSS 閱讀器請求頻率低於一天,肯定就能接收到所有郵件了。
那麼項目思路就有了,使用 serverless 實現一個函數,這個函數每次接受 RSS 閱讀器請求時都去抓取最新的郵件列表,然後響應一個 RSS 格式的 XML 文檔即可。
有了整個項目的思路之後,現在就開始根據 testmail.app 的 API 來寫功能就行了,Serverless 選擇使用 Cloudflare workers,每天十萬次請求數,I/O 時間不限。
- testmail.app:https://testmail.app/
- Cloudflare Workers:https://workers.cloudflare.com/
開始使用 testmail.app#
名詞解釋#
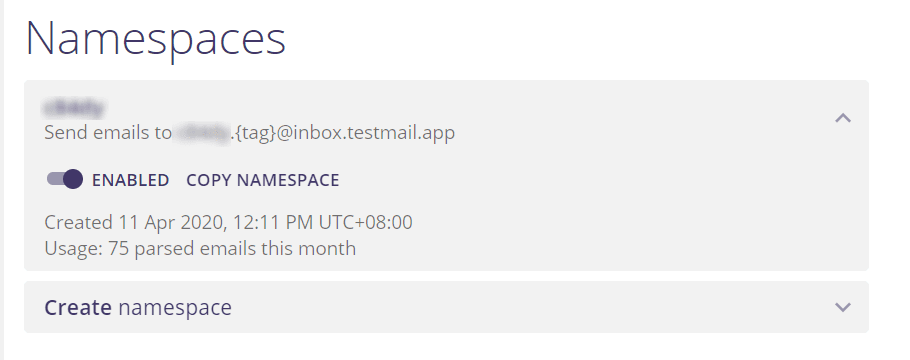
註冊登錄後就能看到一個你自己的 namespace。
testmail.app 裡對 namespace 是這麼描述的:
testmail.app 會接收發送到 {namespace}.{tag}@inbox.testmail.app 的郵件,{namespace} 是分配給每個人的獨自的一個 id,{tag} 是你自己隨便輸入的,之後我們可以通過 API 來過濾 tag 從而獲取我們需要的郵件。
namespace#
每個 namespace 都支持無限數量的電子郵件地址。
舉個例子:假設你的 namespace 是 acmeinc;然後你發一封郵件到 [email protected],再發另一封郵件到 [email protected],然後你都能在 acmeinc 這個 namespace 下查到這兩封郵件,只是兩封郵件帶的 tag 不同。
tag#
tag 可以是任意內容。
舉個例子:假設你要測試一下新用戶註冊的功能,你就可以使用 [email protected] 這個郵箱創建用戶名為 John 的新用戶,通過 [email protected] 這個郵箱創建用戶名為 Albert 的新用戶。
之後查詢 API 的時候,可以過濾指定標籤來查看發給每個用戶的郵件。

使用 API#
文檔地址:https://testmail.app/docs/
testmail.app 支持直接參數查詢和 graphql 兩種查詢方式。
兩種方式都是直接獲取一個 json 格式的響應,裡面有郵件列表,每個郵件的內容,附件,元信息等等。
進行查詢之前要獲取一個 API Key,也是登錄之後在網頁上就能看到了,把 API Key 填到 headers 的 Authorization 即可。
這裡就不詳細說了,就是查 API 獲取想要的郵件的內容,比如我們使用 quartz 這個 tag 訂閱 QuartZ,那我們就只查這個 tag 的郵件即可。
js 實現的請求郵件:
const testmailNamespace = 'xxxxx';
const testmailToken = 'xxxxxxxxxxxxxxx';

class TestMail {
  static testmailApi = 'https://api.testmail.app/api/graphql';

  static async getMails(tag) {
    const query = `{
      inbox (
        namespace: "${testmailNamespace}"
        tag: "${tag}"
        limit: 99
      ) {
        emails {
          id
          subject
          html
          from
          timestamp
          downloadUrl
          attachments {
            cid
            downloadUrl
          }
        }
      }
    }`;

    const init = {
      method: 'POST',
      headers: {
        'content-type': 'application/json;charset=UTF-8',
        Authorization: `Bearer ${testmailToken}`,
        Accept: 'application/json',
      },

      body: JSON.stringify({
        operationName: null,
        query,
        variables: {},
      }),
    };
    return fetch(this.testmailApi, init);
  }
}
注意一下這裡用的是 GraphQL 的請求方式即可。之後只需要調用 await TestMail.getMails(tag) 即可獲取相應 tag 的郵件。
開始使用 Cloudflare Workers#
按照我們的想法,我們需要 Serverless 函數幫我們做一個中間層,根據 RSS 閱讀器的請求生成 RSS 內容。
所以我們就需要:
- 獲取用戶請求的 tag
- 請求 tag 對應的郵件列表
- 返回一個 XML 格式的網頁。
第一步就是解析用戶請求的地址,然後獲取出 tag 就行。
比如用戶請求的 mail2rss.test.workers.dev/tenjs,我們就要把 tenjs 提取出來即可。
Cloudflare Workers 中可以通過 event.request.url 拿到用戶請求的完整 URL,如果你使用的是其他的 Serverless 服務,如果是 koa-like 的話,一般都是也是通過 Request 拿到 url。
const {request} = event;
let url = new URL(request.url);
// parse tag
const requestTag = url.pathname.substring(1);
第二步請求郵件列表我們已經寫好了。
第三步就是生成一個 XML 格式的響應,再返回即可。
實現生成 XML#
這裡我們沒有使用模板引擎,直接拼接字符串就行了。
首先我們得知道 RSS 的文件格式,這裡參考了 RSSHub 的文件內容。
然後寫一個 makeRss 函數,拼接生成字符串就行。
async function makeRss(emails, tag) {
  let items = emails.map((value) => {
    if (value.attachments.length > 0) {
      for (let i of value.attachments) {
        // update the image link
        value.html = value.html.replace(`cid:${i.cid}`, i.downloadUrl);
      }
    }
    return `<item>
    <title><![CDATA[${value.subject}]]></title>
    <description><![CDATA[${value.html}]]></description>
    <pubDate>${new Date(value.timestamp).toGMTString()}</pubDate>
    <guid isPermaLink="false">${value.id}</guid>
    <link>${value.downloadUrl}</link>
    <author><![CDATA[${value.from}]]></author>
</item>`;
  });

  return `<?xml version="1.0" encoding="UTF-8"?>
<rss xmlns:atom="http://www.w3.org/2005/Atom" version="2.0">
    <channel>
        <title><![CDATA[${tag}郵件訂閱]]></title>
        <link>${deployUrl + tag}</link>
        <atom:link href="${
          deployUrl + tag
        }" rel="self" type="application/rss+xml" />
        <description><![CDATA[${tag}郵件訂閱]]></description>
        <generator>mail2rss</generator>
        <webMaster>[email protected] (Artin)</webMaster>
        <language>zh-cn</language>
        <lastBuildDate>${new Date().toGMTString()}</lastBuildDate>
        <ttl>300</ttl>
        ${items.join('\n')}
    </channel>
</rss>`;
}
然後返回響應:
let responseXML = await makeRss(data.data.inbox.emails, requestTag);
let response = new Response(responseXML, {
  status: 200,
  headers: {
    'content-type': 'application/xml; charset=utf-8',
  },
});
response.headers.append('Cache-Control', 'max-age=600');
return response;
總結#
其實思路也很簡單,代碼也很簡單。
完整代碼見:https://github.com/bytemain/mail2rss
參考鏈接#
- DIYgod/RSSHub
https://github.com/DIYgod/RSSHub - testmail.app
https://testmail.app/ - testmail.app Documentation
https://testmail.app/docs/ - Cloudflare Workers
https://workers.cloudflare.com/