I used to subscribe to newsletters using my own email, but it was quite troublesome to receive so many emails every day, mixed in with reminders and communication emails.
I have also tried several newsletter subscription applications and have explored websites and open-source projects related to mail2rss, but I haven't found a good solution.
One day, I accidentally came across testmail.app, a website that allows developers to test email services. Each user can have a namespace and create unlimited email addresses. There is also an API available to filter emails, among other things.
The free version of testmail.app allows receiving 100 emails per month, with emails being saved for one day. However, by setting the RSS reader's request frequency to less than one day, you can receive all the emails.
So, the idea for the project is to use serverless to implement a function that fetches the latest email list every time the RSS reader requests it, and then responds with an RSS-formatted XML document.
With the overall idea in mind, we can now start writing the functionality based on the testmail.app API. We will use Cloudflare Workers as the serverless option, which allows up to 100,000 requests per day and unlimited I/O time.
- testmail.app: https://testmail.app/
- Cloudflare Workers: https://workers.cloudflare.com/
Getting Started with testmail.app#
Terminology#
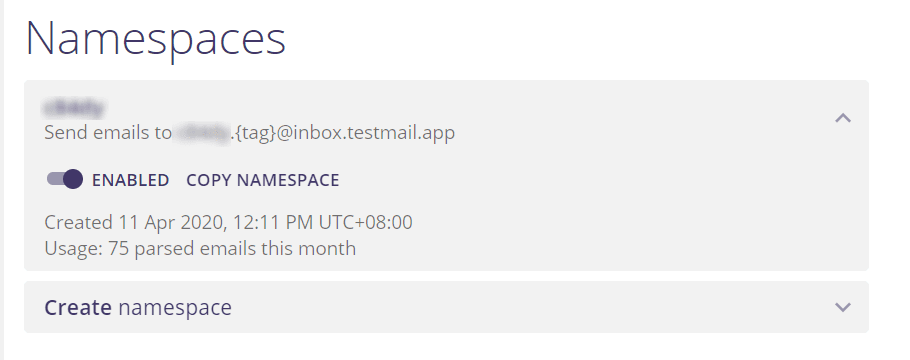
Once you register and log in, you will see your own namespace.
According to testmail.app, a namespace is described as follows:
testmail.app will receive emails sent to {namespace}.{tag}@inbox.testmail.app. {namespace} is a unique ID assigned to each person, and {tag} is a user-defined value. Later, we can use the API to filter emails based on the tag to retrieve the desired emails.
Namespace#
Each namespace supports an unlimited number of email addresses.
For example, let's say your namespace is "acmeinc". If you send an email to acmeinc.hello@inbox.testmail.app and another email to acmeinc.hey@inbox.testmail.app, you will be able to find both emails under the "acmeinc" namespace. The only difference is the tag associated with each email.
Tag#
A tag can be any content.
For example, if you want to test the registration functionality for new users, you can use the email acmeinc.john@inbox.testmail.app to create a new user with the username "John", and use the email acmeinc.albert@inbox.testmail.app to create a new user with the username "Albert".
When querying the API, you can filter emails based on specific tags to view the emails sent to each user.

Using the API#
API documentation: https://testmail.app/docs/
testmail.app supports both direct parameter queries and GraphQL queries. Both methods return a JSON response containing the email list, email content, attachments, metadata, etc.
Before making a query, you need to obtain an API Key, which can be found after logging in to the website. Add the API Key to the Authorization header.
Here, we won't go into detail, but the basic idea is to make an API request to retrieve the desired email content. For example, if we subscribe to QuartZ using the "quartz" tag, we only need to query the emails with that tag.
Here is an example of a JavaScript function to request emails:
const testmailNamespace = 'xxxxx';
const testmailToken = 'xxxxxxxxxxxxxxx';

class TestMail {
  static testmailApi = 'https://api.testmail.app/api/graphql';

  static async getMails(tag) {
    const query = `{
      inbox (
        namespace: "${testmailNamespace}"
        tag: "${tag}"
        limit: 99
      ) {
        emails {
          id
          subject
          html
          from
          timestamp
          downloadUrl
          attachments {
            cid
            downloadUrl
          }
        }
      }
    }`;

    const init = {
      method: 'POST',
      headers: {
        'content-type': 'application/json;charset=UTF-8',
        Authorization: `Bearer ${testmailToken}`,
        Accept: 'application/json',
      },

      body: JSON.stringify({
        operationName: null,
        query,
        variables: {},
      }),
    };
    return fetch(this.testmailApi, init);
  }
}
Note that we are using the GraphQL request method. Later, you can simply call await TestMail.getMails(tag) to retrieve the emails with the specified tag.
Getting Started with Cloudflare Workers#
According to our plan, we need a serverless function to act as an intermediary layer, generating the RSS content based on the RSS reader's request.
So, we need to:
- Parse the tag from the user's request.
- Request the email list for the tag.
- Return an XML-formatted webpage.
The first step is to parse the user's request URL and extract the tag. For example, if the user requests mail2rss.test.workers.dev/tenjs, we need to extract tenjs.
In Cloudflare Workers, you can use event.request.url to get the complete URL of the user's request. If you are using another serverless service, such as a koa-like framework, you can usually get the URL from the Request object.
const { request } = event;
let url = new URL(request.url);
// parse tag
const requestTag = url.pathname.substring(1);
We have already written the code to request the email list for a specific tag.
The next step is to generate an XML response and return it.
Implementing XML Generation#
Here, we won't be using a template engine. We will simply concatenate strings to generate the XML.
First, we need to understand the RSS file format. We can refer to the RSSHub file content. Then, we can write a makeRss function to concatenate the strings and generate the XML.
async function makeRss(emails, tag) {
  let items = emails.map((value) => {
    if (value.attachments.length > 0) {
      for (let i of value.attachments) {
        // update the image link
        value.html = value.html.replace(`cid:${i.cid}`, i.downloadUrl);
      }
    }
    return `<item>
    <title><![CDATA[${value.subject}]]></title>
    <description><![CDATA[${value.html}]]></description>
    <pubDate>${new Date(value.timestamp).toGMTString()}</pubDate>
    <guid isPermaLink="false">${value.id}</guid>
    <link>${value.downloadUrl}</link>
    <author><![CDATA[${value.from}]]></author>
</item>`;
  });

  return `<?xml version="1.0" encoding="UTF-8"?>
<rss xmlns:atom="http://www.w3.org/2005/Atom" version="2.0">
    <channel>
        <title><![CDATA[${tag} Subscription]]></title>
        <link>${deployUrl + tag}</link>
        <atom:link href="${
          deployUrl + tag
        }" rel="self" type="application/rss+xml" />
        <description><![CDATA[${tag} Subscription]]></description>
        <generator>mail2rss</generator>
        <webMaster>lengthmin@gmail.com (Artin)</webMaster>
        <language>en-us</language>
        <lastBuildDate>${new Date().toGMTString()}</lastBuildDate>
        <ttl>300</ttl>
        ${items.join('\n')}
    </channel>
</rss>`;
}
Then, we can return the response:
let responseXML = await makeRss(data.data.inbox.emails, requestTag);
let response = new Response(responseXML, {
  status: 200,
  headers: {
    'content-type': 'application/xml; charset=utf-8',
  },
});
response.headers.append('Cache-Control', 'max-age=600');
return response;
Summary#
The overall idea and code implementation are quite simple.
You can find the complete code here: https://github.com/bytemain/mail2rss
References#
- DIYgod/RSSHub
https://github.com/DIYgod/RSSHub - testmail.app
https://testmail.app/ - testmail.app Documentation
https://testmail.app/docs/ - Cloudflare Workers
https://workers.cloudflare.com/